
Articles
Anti-DDoS Appliances
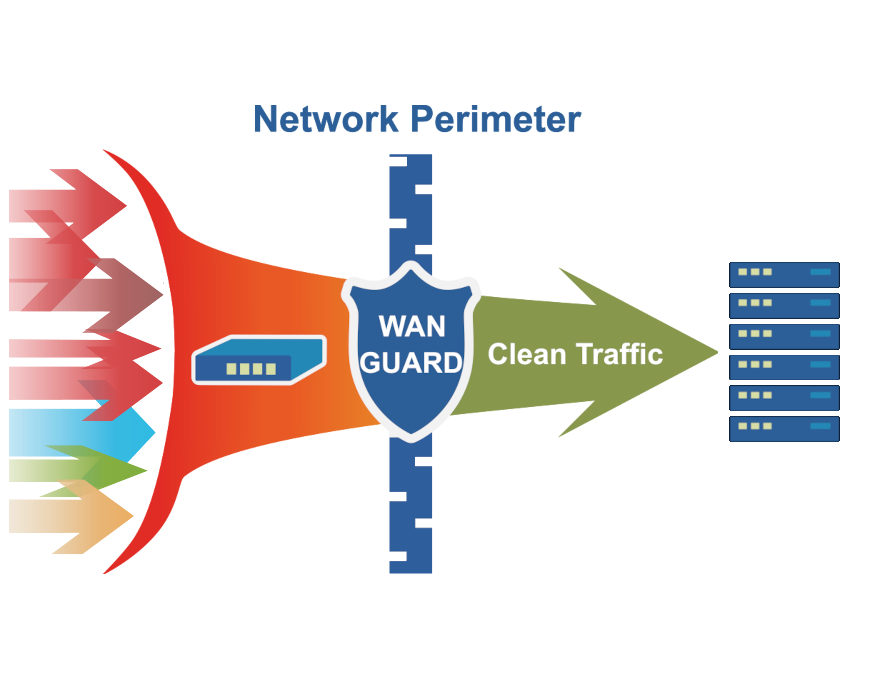
Andrisoft offers turnkey network security appliances pre-configured with our DDoS detection and mitigation software to actively protect networks from 10 Gbps to 100 Gbps. The appliances are based on open source standards to allow quick and seamless integration in any existing infrastructure. They are remarkably robust and they offer one of the best verifiable cost-to-performance ratios in the industry.
| WS-100 | WS-40 | WS-C | |
 |
|
|
|
 Server Role* Server Role* |
DDoS Detection & Mitigation | DDoS Detection & Mitigation | Flow Collector / Web Console |
| |
2 x 100 Gbps (~50 Mpps) | 2 x 10/40 Gbps (~30 Mpps) | - |
| |
240 GB SSD | 240 GB SSD | 2 x 2-10 TB HDD / 240-960 GB SSD |
| |
2 x RJ-45 (Management + IPMI) | 2 x RJ-45 (Management + IPMI) | 2 x RJ-45 (Management + IPMI) |
| |
- | 2 x SFP+ (In + Out) | - |
| |
- | 2 x QSFP+ (In + Out) | - |
| |
2 x QSFP28 (In + Out) | - | - |
| |
Redundant, 2 x 750W, 240V, IEC C14 | Redundant, 2 x 750W, 240V, IEC C14 | Redundant, 2 x 750W, 240V, IEC C14 |
 Dimensions Dimensions |
Height 1.7" (43 mm) Width 17.2" (437 mm) Depth 25.6" (650 mm) |
Height 1.7" (43 mm) Width 17.2" (437 mm) Depth 25.6" (650 mm) |
Height 1.7" (43 mm) Width 17.2" (437 mm) Depth 25.6" (650 mm) |
 Warranty Warranty |
36 Months | 36 Months | 36 Months |
 Delivery Zone Delivery Zone |
European Union | European Union | European Union |
 Hw Price + Sw for 1 year Hw Price + Sw for 1 year |
10900 € | 9600 € | 6800 € |
 Availability Availability |
Contact Diese E-Mail-Adresse ist vor Spambots geschützt! Zur Anzeige muss JavaScript eingeschaltet sein! | Contact Diese E-Mail-Adresse ist vor Spambots geschützt! Zur Anzeige muss JavaScript eingeschaltet sein! | Contact Diese E-Mail-Adresse ist vor Spambots geschützt! Zur Anzeige muss JavaScript eingeschaltet sein! |
* Wanguard Console on WS-40/-100 has access to a single CPU core, while all the other cores are used exclusively for packet analysis and forwarding.


Wanguard and Wansight can be installed using the APT package manager. The software runs exclusively on 64-bit / amd64 architectures.
All packages were tested on a stock Ubuntu Server 14. This distribution will receive updates until April 2024.
| USER GUIDES: | Wanguard 8.1 User Guide |
| Wansight 8.1 User Guide |
| CONSOLE INSTALLATION STEPS: |
Step 1. Install the Andrisoft repository Add the Andrisoft repository to APT. ubuntu:~# apt-get install apt-transport-https wget
ubuntu:~# wget --no-check-certificate -O - https://www.andrisoft.com/andrisoft.gpg.key | apt-key add - ubuntu:~# echo "deb https://www.andrisoft.com/files/ubuntu14 trusty main" > /etc/apt/sources.list.d/andrisoft.list Step 2. Install the packages Install the wanconsole package and dependencies. Configure and start ntpd to prevent clock de-synchronization issues. ubuntu:~# apt-get update
ubuntu:~# apt-get install wanconsole ubuntu:~# service ntp start ubuntu:~# update-rc.d ntp defaults Step 3. Configure the MySQL service By default MySQL is bound to the loopback interface, so you should comment the bind-address parameter. If you deploy Sensors or Filters on remote systems, make sure that the MySQL server is accessible by opening port tcp/3306 in the firewall. ubuntu:~# nano /etc/mysql/my.cnf #comment any "bind-address" directive, enable "max_connections=600", edit "max_allowed_packet=64M" and add "skip-name-resolve", all in the [mysqld] section
ubuntu:~# service mysql restart Step 4. Reload the Apache service Reload the PHP configuration by restarting the Apache service. ubuntu:~# service apache2 restart
Step 5. Install the Console's database Finish installing the Console by running the /opt/andrisoft/bin/install_console script. Enter the MySQL root password, and provide a new password for the Console's database. In Ubuntu 14, the recommended database storage engine is MyISAM. ubuntu:~# /opt/andrisoft/bin/install_console
Step 6. Configure the Supervisor The WANsupervisor daemon must be installed and started on all systems. You have to run the /opt/andrisoft/bin/install_supervisor script to enter the Console's IP address and database password you set on step 5. ubuntu:~# /opt/andrisoft/bin/install_supervisor
ubuntu:~# service WANsupervisor start ubuntu:~# update-rc.d WANsupervisor defaults 99 Step 7. Install InfluxDB Install influxdb from https://portal.influxdata.com/downloads or from the link listed below and execute /opt/andrisoft/bin/install_influxdb to initialize the influxdb database. ubuntu:~# wget https://dl.influxdata.com/influxdb/releases/influxdb_1.8.10_amd64.deb
ubuntu:~# dpkg -i ./influxdb_1.8.10_amd64.deb ubuntu:~# cp /etc/influxdb/influxdb.conf /etc/influxdb/influxdb.conf.backup ubuntu:~# cp /opt/andrisoft/etc/influxdb.conf /etc/influxdb/influxdb.conf ubuntu:~# service influxdb restart ubuntu:~# /opt/andrisoft/bin/install_influxdb Step 8. Access the Console The Console web interface is accessible by pointing your web browser to http://<hostname>/wanguard or http://<hostname>/wansight, where <hostname> is the name of the server running the Console. The default username is "admin" with the password "changeme". |
| SENSOR INSTALLATION STEPS: |
Step 1. Install the Andrisoft repository Add the repository to APT if it's not already being used. ubuntu:~# apt-get install apt-transport-https wget
ubuntu:~# wget --no-check-certificate -O - https://www.andrisoft.com/andrisoft.gpg.key | apt-key add - ubuntu:~# echo "deb https://www.andrisoft.com/files/ubuntu14 trusty main" > /etc/apt/sources.list.d/andrisoft.list Step 2. Install the packages Install the wansensor package and dependencies. Configure and start ntpd to prevent clock de-synchronization issues. ubuntu:~# apt-get update ubuntu:~# apt-get install wansensor ubuntu:~# service ntp start ubuntu:~# update-rc.d ntp defaults Step 3. Install, configure and start the Supervisor This step is required if you haven't previously installed and configured WANsupervisor on the target system. In order to configure the Supervisor, you have to run the /opt/andrisoft/bin/install_supervisor script to enter the Console's IP address and database password. ubuntu:~# /opt/andrisoft/bin/install_supervisor ubuntu:~# service WANsupervisor start ubuntu:~# update-rc.d WANsupervisor defaults 99 Step 4. Setup the Sensor Log into the Console to setup the Sensor(s). Sensors are started, monitored and stopped by the WANsupervisor daemon, so make sure the WANsupervisor service is always running. |
| FILTER INSTALLATION STEPS: |
Step 1. Install the Andrisoft repository Add the repository to APT if it's not already being used. ubuntu:~# apt-get install apt-transport-https wget ubuntu:~# wget --no-check-certificate -O - https://www.andrisoft.com/andrisoft.gpg.key | apt-key add - ubuntu:~# echo "deb https://www.andrisoft.com/files/ubuntu14 trusty main" > /etc/apt/sources.list.d/andrisoft.list Step 2. Install the packages Install the wanfilter package and dependencies. Configure and start ntpd to prevent clock de-synchronization issues. ubuntu:~# apt-get update ubuntu:~# apt-get install wanfilter ubuntu:~# service ntp start ubuntu:~# update-rc.d ntp defaults Step 3. Install, configure and start the Supervisor This step is required if you haven't previously installed and configured WANsupervisor on the target system. In order to configure the Supervisor, you have to run the /opt/andrisoft/bin/install_supervisor script to enter the Console's IP address and database password. ubuntu:~# /opt/andrisoft/bin/install_supervisor ubuntu:~# service WANsupervisor start ubuntu:~# update-rc.d WANsupervisor defaults 99 Step 4. Setup the Filter Log in to the Console to set up Filter(s). Filters are started, monitored and stopped by the WANsupervisor daemon, so make sure the WANsupervisor service is always running. |

Wanguard and Wansight can be installed on 64-bit architectures using the APT package manager.
All packages were tested on Ubuntu Server 12.x.
| USER GUIDES: | Wanguard 7.1 User Guide |
| Wansight 7.1 User Guide |
| CONSOLE INSTALLATION STEPS: |
Step 1. Install the Andrisoft repository Add the Andrisoft repository to APT. ubuntu:~# apt-get install apt-transport-https wget
ubuntu:~# wget --no-check-certificate -O - https://www.andrisoft.com/andrisoft.gpg.key | apt-key add - ubuntu:~# echo "deb https://www.andrisoft.com/files/ubuntu12 precise main" > /etc/apt/sources.list.d/andrisoft.list Step 2. Install the packages Install the wanconsole package and dependencies. Configure and start ntpd to prevent clock de-synchronization issues. ubuntu:~# apt-get update
ubuntu:~# apt-get install wanconsole ubuntu:~# service ntp start ubuntu:~# update-rc.d ntp defaults Step 3. Configure the MySQL service By default MySQL is bound to the loopback interface, so you should comment the bind-address parameter. If you deploy Sensors or Filters on remote systems, make sure that the MySQL server is accessible by opening port tcp/3306 in the firewall. ubuntu:~# nano /etc/mysql/my.cnf #comment any "bind-address" directive, enable "max_connections=600", edit "max_allowed_packet=64M" and add "skip-name-resolve", all in the [mysqld] section
ubuntu:~# service mysql restart Step 4. Reload the Apache service Reload the PHP configuration by restarting the Apache service. ubuntu:~# service apache2 restart
Step 5. Install the Console's database Finish installing the Console by running the /opt/andrisoft/bin/install_console script. Enter the MySQL root password, and provide a new password for the Console's database. ubuntu:~# /opt/andrisoft/bin/install_console
Step 6. Configure the Supervisor The WANsupervisor daemon must be installed and started on all systems. You have to run the /opt/andrisoft/bin/install_supervisor script to enter the Console's IP address and database password you set on step 5. ubuntu:~# /opt/andrisoft/bin/install_supervisor
ubuntu:~# service WANsupervisor start ubuntu:~# update-rc.d WANsupervisor defaults 99 Step 7. Access the Console The Console web interface is accessible by pointing your web browser to http://<hostname>/wanguard or http://<hostname>/wansight, where <hostname> is the name of the server running the Console. The default username is "admin" with the password "changeme". Continue with the installation of the Sensor by following the steps below. |
| SENSOR INSTALLATION STEPS: |
Step 1. Install the Andrisoft repository Add the repository to APT if it's not already being used. ubuntu:~# apt-get install apt-transport-https wget
ubuntu:~# wget --no-check-certificate -O - https://www.andrisoft.com/andrisoft.gpg.key | apt-key add - ubuntu:~# echo "deb https://www.andrisoft.com/files/ubuntu12 precise main" > /etc/apt/sources.list.d/andrisoft.list Step 2. Install the packages Install the wansensor package and dependencies. Configure and start ntpd to prevent clock de-synchronization issues. ubuntu:~# apt-get update ubuntu:~# apt-get install wansensor ubuntu:~# service ntp start ubuntu:~# update-rc.d ntp defaults Step 3. Install, configure and start the Supervisor This step is required if you haven't previously installed and configured WANsupervisor on the target system. In order to configure the Supervisor, you have to run the /opt/andrisoft/bin/install_supervisor script to enter the Console's IP address and database password. ubuntu:~# /opt/andrisoft/bin/install_supervisor ubuntu:~# service WANsupervisor start ubuntu:~# update-rc.d WANsupervisor defaults 99 Step 4. Setup the Sensor Log into the Console to setup the Sensor(s). Sensors are started, monitored and stopped by the WANsupervisor daemon, so make sure the WANsupervisor service is always running. |
| FILTER INSTALLATION STEPS: |
Step 1. Install the Andrisoft repository Add the repository to APT if it's not already being used. ubuntu:~# apt-get install apt-transport-https wget ubuntu:~# wget --no-check-certificate -O - https://www.andrisoft.com/andrisoft.gpg.key | apt-key add - ubuntu:~# echo "deb https://www.andrisoft.com/files/ubuntu12 precise main" > /etc/apt/sources.list.d/andrisoft.list Step 2. Install the packages Install the wanfilter package and dependencies. Configure and start ntpd to prevent clock de-synchronization issues. ubuntu:~# apt-get update ubuntu:~# apt-get install wanfilter ubuntu:~# service ntp start ubuntu:~# update-rc.d ntp defaults Step 3. Install, configure and start the Supervisor This step is required if you haven't previously installed and configured WANsupervisor on the target system. In order to configure the Supervisor, you have to run the /opt/andrisoft/bin/install_supervisor script to enter the Console's IP address and database password. ubuntu:~# /opt/andrisoft/bin/install_supervisor ubuntu:~# service WANsupervisor start ubuntu:~# update-rc.d WANsupervisor defaults 99 Step 4. Setup the Filter Log in to the Console to set up Filter(s). Filters are started, monitored and stopped by the WANsupervisor daemon, so make sure the WANsupervisor service is always running. |
 Probieren
  Füllen Sie das
  Erstellen Sie Ihre eigene
  Nutzen Sie die voll funktionsfähige Testversion für 30 Tage. Unsere Ingenieure
  Kaufen Sie die zu jeder Zeit verfügbaren Software-Jahreslizenzen über unseren