PREV
NEXT
  • Software de detección de ataques DDoS

    Wanguard detecta ataques volumétricos DDoS mediante la utilización de un motor de detección de anomalías en el tráfico de gran rapidez y sumamente innovador que compara más de 130 parámetros relativos al tráfico con los umbrales definidos por el usuario, y describe el comportamiento online de los usuarios a fin de detectar picos de tráfico. Reacciona automáticamente ante las amenazas mediante la ejecución de módulos de acción prefijados que envían correos electrónicos de notificación, anuncian prefijos en BGP, generan traps (alarmas) SNMP, modifican listas ACL (listas de control de acceso) y ejecutan scripts personalizados con acceso a una API de fácil manejo que muestra más de 80 parámetros de tráfico. Los ataques DDoS se detectan a través de análisis de paquetes (packet sniffing), sondeo SNMP o la utilización de tecnologías basadas en flujos de diversos proveedores.

  • Software de mitigación de ataques DDoS

    El Filtro de Wanguard (Wanguard Filter) garantiza a clientes y servicios un funcionamiento ininterrumpido durante ataques distribuidos de denegación de servicio, de forma automática, sin necesidad de intervención por parte del operador. Está diseñado para ofrecer protección contra ataques DDoS mediante la eliminación de tráfico malicioso en la propia infraestructura local del cliente y el envío de notificaciones al proveedor de acceso a Internet del atacante. Reglas de filtrado inteligentes y dinámicas que se aplican en firewalls de hardware o software sin estado (stateless) o routers compatibles con BGP FlowSpec bloquean cada uno de los paquetes maliciosos. Puede realizar el filtrado en el lado del cliente mediante el uso del protocolo BGP para desviar el tráfico / volver a introducirlo en la red, o puede ejecutarse en servidores especializados en la normalización de paquetes implementados en la ruta de datos principal.

  • Visibilidad completa del tráfico en la red

    Wanguard y Wansight ofrecen visibilidad completa del tráfico en la red mediante el uso de sensores distribuidos ("sondas") capaces de capturar paquetes IP, realizar consultas a dispositivos SNMP y analizar registros de flujos exportados por Cisco NetFlow, Huawei Netstream, Juniper jFlow, cflowd, sFlow e IPFIX. Se puede acceder a todos los datos recopilados en una interfaz de usuario basada en web que ofrece panales personalizados, gráficas en tiempo real sobre el tráfico y principales estadísticas. Podrá generar con rapidez análisis complejos con datos agregados para hosts, departamentos, interfaces, aplicaciones, protocolos, sistemas autónomos y países; visualizar gráficas precisas de ancho de banda para miles de direcciones IP, así como inspeccionar paquetes y flujos.

  • Recopilador y analizador de flujos

    Wanguard y Wansight incluyen un Sensor de flujos (Flow Sensor). Se trata de un recopilador y analizador de flujos con plena funcionalidad compatible con las principales tecnologías de flujos (NetFlow versiones 5, 7 y 9; IETF IPFIX; sFlow versiones 4 y 5) y que contiene un motor de correlación de tráfico de gran escalabilidad capaz de monitorizar continuamente cientos de miles de rangos y direcciones IPv4 e IPv6. Los flujos pueden almacenarse durante el tiempo que requiera el cliente en formato binario comprimido. Es posible generar los principales listados, así como casi cualquier otro tipo de informe de agregación imaginable. La gran variedad de opciones de expresión de filtrado de flujos permiten consultar rápidamente flujos individuales para su uso en investigaciones forenses ad-hoc.

  • Analizador de paquetes

    Wanguard y Wansight incluyen un Sensor de paquetes (Packet Sensor), que inspecciona paquetes IP mediante el análisis a velocidad de cable de interfaces de 1/10/40 Gbps en línea o con puertos espejo conectados, y contiene un motor de análisis de tráfico IP totalmente escalable capaz de monitorizar en tiempo real decenas de miles de rangos y direcciones IPv4 e IPv6. Los usuarios pueden guardar volcados de paquetes para su uso en investigaciones forenses o para ayudar a resolver problemas que puedan surgir en la red. Los volcados de paquetes pueden descargarse o examinarse online en una interfaz parecida a la de Wireshark, que muestra información detallada sobre la capa de aplicación (nivel 7) o datos ASCI y hexadecimales sin procesar para su inclusión en expresiones regulares. Es compatible con Libpcap, PF_RING Vanilla, PF_RING ZC, Netmap y Sniffer 10G.

Anti-DDoS Appliances

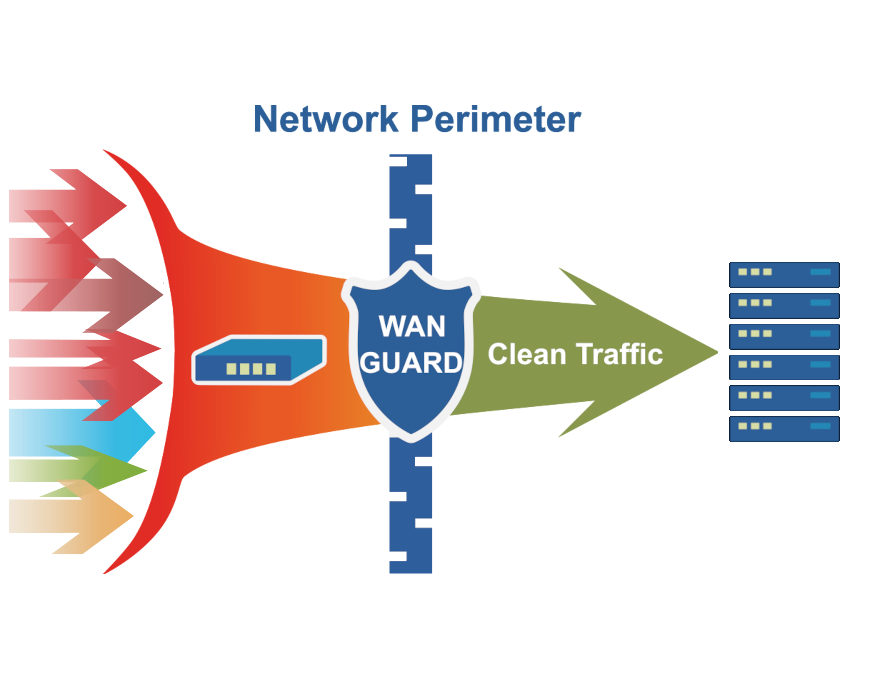
Andrisoft offers turnkey network security appliances pre-configured with our DDoS detection and mitigation software to actively protect networks from 10 Gbps to 40 Gbps. The appliances are based on open source standards to allow quick and seamless integration in any existing infrastructure. They are remarkably robust and they offer one of the best verifiable cost-to-performance ratios in the industry.


WGS-10 WGS-40 WGS-C
  Server Role* DDoS Detection & Mitigation DDoS Detection & Mitigation Flow Collector & Console
  Throughput 10 Gbps, In-line or Out-of-line 40 Gbps, In-line or Out-of-line -
  Processor Intel® Xeon® Broadwell Intel® Xeon® Broadwell Intel® Xeon® Broadwell
  RAM 32 GB 32 GB 16 GB
  Hard Disk 240 GB SSD 240 GB SSD 2 x 2-10 TB HDD / 240-960 GB SSD
  1G Ethernet 2 (Management + IPMI) 2 (Management + IPMI) 2 (Management + IPMI)
  10G Ethernet 2 x SFP+ - -
  40G Ethernet - 2 x QSFP+ -
  Power Supply Redundant, 2 x 750W, 240V, IEC C14 Redundant, 2 x 750W, 240V, IEC C14 Redundant, 2 x 750W, 240V, IEC C14
  Dimensions Height 1.7" (43 mm)
Width 17.2" (437 mm)
Depth 25.6" (650 mm)
Height 1.7" (43 mm)
Width 17.2" (437 mm)
Depth 25.6" (650 mm)
Height 1.7" (43 mm)
Width 17.2" (437 mm)
Depth 25.6" (650 mm)
  Warranty 36 Months 36 Months 36 Months
  Price & Availability Contact Esta dirección de correo electrónico está siendo protegida contra los robots de spam. Necesita tener JavaScript habilitado para poder verlo. Contact Esta dirección de correo electrónico está siendo protegida contra los robots de spam. Necesita tener JavaScript habilitado para poder verlo. Contact Esta dirección de correo electrónico está siendo protegida contra los robots de spam. Necesita tener JavaScript habilitado para poder verlo.
* Wanguard Console on WGS-10 and WGS-40 has access only to a single CPU core.

Ubuntu 16 is not supported by Wanguard 8.4 or newer!

Wanguard and Wansight can be installed using the APT package manager. The software runs exclusively on 64-bit Intel or AMD architectures. All packages were tested on a stock Ubuntu Server 16.04 LTS. This distribution will receive updates until April 2026 with a Ubuntu Pro subscription. Below you can find the installation steps for Console, Sensor and Filter.


USER GUIDES:   Wanguard 8.3 User Guide
Wansight 8.3 User Guide

CONSOLE
INSTALLATION
STEPS:
Step 1. Install the Andrisoft repository
First add the Andrisoft repository to APT.
ubuntu:~# apt install apt-transport-https wget
ubuntu:~# wget --no-check-certificate -O - https://www.andrisoft.com/andrisoft.gpg.key | apt-key add -
ubuntu:~# echo "deb https://www.andrisoft.com/files/ubuntu16 xenial main" > /etc/apt/sources.list.d/andrisoft.list

Step 2. Install the packages
Install the wanconsole package and dependencies. Configure and start ntpd to prevent clock de-synchronization issues.
ubuntu:~# apt update
ubuntu:~# apt install wanconsole
ubuntu:~# systemctl restart ntp
ubuntu:~# systemctl enable ntp

Step 3. Configure the MySQL service
Configure MySQL as required in the step below. If you deploy Sensors or Filters on remote systems, make sure that the MySQL server is accessible by opening port tcp/3306 in the firewall.
ubuntu:~# nano /etc/mysql/mysql.conf.d/mysqld.cnf #set bind-address=0.0.0.0, max_connections=1000, max_allowed_packet=200M, and add skip-name-resolve, open_files_limit=5000, log_error_verbosity=2 and sql-mode="NO_ENGINE_SUBSTITUTION" in the [mysqld] section
ubuntu:~# systemctl restart mysql

Step 4. Reload the Apache service
Reload the PHP configuration by restarting the Apache service.
ubuntu:~# systemctl restart apache2

Step 5. Install the Console's database
Finish installing the Console by running the /opt/andrisoft/bin/install_console script. Enter the MySQL root password, and provide a new password for the Console's database. In Ubuntu 16, the recommended database storage engine is MyISAM.
ubuntu:~# /opt/andrisoft/bin/install_console

Step 6. Configure the Supervisor
The WANsupervisor daemon must be installed and started on all systems. You have to run the /opt/andrisoft/bin/install_supervisor script to enter the Console's IP address and database password you set on step 5.
ubuntu:~# /opt/andrisoft/bin/install_supervisor
ubuntu:~# systemctl start WANsupervisor
ubuntu:~# systemctl enable WANsupervisor

Step 7. Install InfluxDB
Install influxdb from https://portal.influxdata.com/downloads or from the link listed below and execute /opt/andrisoft/bin/install_influxdb to initialize the influxdb database.
ubuntu:~# wget https://dl.influxdata.com/influxdb/releases/influxdb_1.8.10_amd64.deb
ubuntu:~# dpkg -i ./influxdb_1.8.10_amd64.deb
ubuntu:~# cp /etc/influxdb/influxdb.conf /etc/influxdb/influxdb.conf.backup
ubuntu:~# cp /opt/andrisoft/etc/influxdb.conf /etc/influxdb/influxdb.conf
ubuntu:~# systemctl restart influxdb
ubuntu:~# /opt/andrisoft/bin/install_influxdb

Step 8. Access the Console
The Console web interface is accessible by pointing your web browser to http://<hostname>/wanguard or http://<hostname>/wansight, where <hostname> is the name of the server running the Console. The default username is "admin" with the password "changeme".
 
SENSOR
INSTALLATION 
STEPS:
Step 1. Install the Andrisoft repository
Add the repository to APT if it's not already being used.
ubuntu:~# apt install apt-transport-https wget
ubuntu:~# wget --no-check-certificate -O - https://www.andrisoft.com/andrisoft.gpg.key | apt-key add -
ubuntu:~# echo "deb https://www.andrisoft.com/files/ubuntu16 xenial main" > /etc/apt/sources.list.d/andrisoft.list

Step 2. Install the packages
Install the wansensor package and dependencies. Configure and start ntpd to prevent clock de-synchronization issues.
ubuntu:~# apt update
ubuntu:~# apt install wansensor
ubuntu:~# systemctl restart ntp
ubuntu:~# systemctl enable ntp

Step 3. Install, configure and start the Supervisor
This step is required if you haven't previously installed and configured WANsupervisor on the target system. In order to configure the Supervisor, you have to run the /opt/andrisoft/bin/install_supervisor script to enter the Console's IP address and database password.
ubuntu:~# /opt/andrisoft/bin/install_supervisor
ubuntu:~# systemctl start WANsupervisor
ubuntu:~# systemctl enable WANsupervisor

Step 4. Setup the Sensor
Log into the Console to setup the Sensor(s). Sensors are started, monitored and stopped by the WANsupervisor daemon, so make sure the WANsupervisor service is always running.
 
FILTER
INSTALLATION
STEPS:
Step 1. Install the Andrisoft repository
Add the repository to APT if it's not already being used.
ubuntu:~# apt install apt-transport-https wget
ubuntu:~# wget --no-check-certificate -O - https://www.andrisoft.com/andrisoft.gpg.key | apt-key add -
ubuntu:~# echo "deb https://www.andrisoft.com/files/ubuntu16 xenial main" > /etc/apt/sources.list.d/andrisoft.list

Step 2. Install the packages
Install the wanfilter package and dependencies. Configure and start ntpd to prevent clock de-synchronization issues.
ubuntu:~# apt update
ubuntu:~# apt install wanfilter
ubuntu:~# systemctl restart ntp
ubuntu:~# systemctl enable ntp

Step 3. Install, configure and start the Supervisor
This step is required if you haven't previously installed and configured WANsupervisor on the target system. In order to configure the Supervisor, you have to run the /opt/andrisoft/bin/install_supervisor script to enter the Console's IP address and database password.
ubuntu:~# /opt/andrisoft/bin/install_supervisor
ubuntu:~# systemctl start WANsupervisor
ubuntu:~# systemctl enable WANsupervisor

Step 4. Setup the Filter
Log in to the Console to set up Filter(s). Filters are started, monitored and stopped by the WANsupervisor daemon, so make sure the WANsupervisor service is always running.

Wanguard and Wansight can be installed quickly and easily with the APT package manager. The software runs exclusively on 64-bit Intel or AMD architectures. All packages were tested on a stock Ubuntu Server 18.04 LTS. This distribution will receive OS updates until April 2028 with a Ubuntu Pro subscription. Below you can find the installation steps for Console, Sensor and Filter.


USER GUIDES:   Wanguard 8.4 User Guide
Wansight 8.4 User Guide

CONSOLE
INSTALLATION
STEPS:
Step 1. Install the Andrisoft repository
First, add the Andrisoft repository to APT.
ubuntu:~# apt install apt-transport-https wget
ubuntu:~# wget --no-check-certificate -O - https://www.andrisoft.com/andrisoft.gpg.key | apt-key add -
ubuntu:~# echo "deb https://packages.andrisoft.com bionic main" > /etc/apt/sources.list.d/andrisoft.list

Step 2. Install the packages
Install the wanconsole package and its dependencies. Configure and start ntpd to prevent clock de-synchronization issues.
ubuntu:~# apt update
ubuntu:~# apt install wanconsole
ubuntu:~# systemctl restart ntp
ubuntu:~# systemctl enable ntp

Step 3. Configure the MySQL service
By default MySQL is bound to the loopback interface, so you should comment the bind-address line. Also, make sure you add sql-mode="NO_ENGINE_SUBSTITUTION" line. If you deploy Sensors or Filters on remote systems, make sure that the MySQL server is accessible by opening port tcp/3306 in the firewall.
ubuntu:~# nano /etc/mysql/mysql.conf.d/mysqld.cnf #comment the bind-address directive, set max_connections=1000, max_allowed_packet=256M, and add skip-name-resolve, open_files_limit=5000, log_error_verbosity=2 and sql-mode="NO_ENGINE_SUBSTITUTION" in the [mysqld] section
ubuntu:~# systemctl restart mysql

Step 4. Reload the Apache service
Reload the PHP configuration by restarting the Apache service.
ubuntu:~# systemctl restart apache2

Step 5. Install the database
Finish installing the Console by running the /opt/andrisoft/bin/install_console script. Enter the MySQL root password, and provide a password for a new database named "andrisoft". In Ubuntu 18, the recommended database storage engine is MyISAM.
ubuntu:~# /opt/andrisoft/bin/install_console

Step 6. Configure the WANsupervisor service
The WANsupervisor daemon must be installed and started on all systems. You have to run the /opt/andrisoft/bin/install_supervisor script to enter the Console's IP address and database password you set on step 5.
ubuntu:~# /opt/andrisoft/bin/install_supervisor
ubuntu:~# systemctl start WANsupervisor
ubuntu:~# systemctl enable WANsupervisor

Step 7. Install InfluxDB
Install influxdb from https://portal.influxdata.com/downloads or from the link listed below and execute /opt/andrisoft/bin/install_influxdb to initialize the influxdb database.
ubuntu:~# wget https://dl.influxdata.com/influxdb/releases/influxdb_1.8.10_amd64.deb
ubuntu:~# dpkg -i ./influxdb_1.8.10_amd64.deb
ubuntu:~# cp /etc/influxdb/influxdb.conf /etc/influxdb/influxdb.conf.backup
ubuntu:~# cp /opt/andrisoft/etc/influxdb.conf /etc/influxdb/influxdb.conf
ubuntu:~# systemctl restart influxdb
ubuntu:~# /opt/andrisoft/bin/install_influxdb

Step 8. Access the Console
The Console web interface is accessible by pointing your web browser to http://<hostname>/wanguard or http://<hostname>/wansight, where <hostname> is the name of the server running the Console. The default username is "admin" with the password "changeme". It is highly recommended to install an SSL certificate in Apache to be able to connect securely to Console via HTTPS.
 
SENSOR
INSTALLATION 
STEPS:
Step 1. Install the Andrisoft repository
Add the Andrisoft repository to APT. You can skip these installations steps on the Console server.
ubuntu:~# apt install apt-transport-https wget
ubuntu:~# wget --no-check-certificate -O - https://www.andrisoft.com/andrisoft.gpg.key | apt-key add -
ubuntu:~# echo "deb https://packages.andrisoft.com bionic main" > /etc/apt/sources.list.d/andrisoft.list

Step 2. Install the packages
Install the wansensor package and dependencies. Configure and start ntpd to prevent clock de-synchronization issues.
ubuntu:~# apt update
ubuntu:~# apt install wansensor
ubuntu:~# systemctl restart ntp
ubuntu:~# systemctl enable ntp

Step 3. Install, configure and start the WANsupervisor service
This step is required if you haven't previously installed and configured WANsupervisor on the target system. In order to configure the WANsupervisor service, you have to run the /opt/andrisoft/bin/install_supervisor script to enter the Console IP address and database password.
ubuntu:~# /opt/andrisoft/bin/install_supervisor
ubuntu:~# systemctl start WANsupervisor
ubuntu:~# systemctl enable WANsupervisor

Step 4. Setup the Sensor
Log into the Console to setup the Sensor(s). Sensors are started, monitored and stopped by the WANsupervisor daemon, so make sure the WANsupervisor service is always running.
 
FILTER
INSTALLATION
STEPS:
Step 1. Install the Andrisoft repository
Add the Andrisoft repository to APT. You can skip these installations steps on the Console server.
ubuntu:~# apt install apt-transport-https wget
ubuntu:~# wget --no-check-certificate -O - https://www.andrisoft.com/andrisoft.gpg.key | apt-key add -
ubuntu:~# echo "deb https://packages.andrisoft.com bionic main" > /etc/apt/sources.list.d/andrisoft.list

Step 2. Install the packages
Install the wanfilter package and dependencies. Configure and start ntpd to prevent clock de-synchronization issues.
ubuntu:~# apt update
ubuntu:~# apt install wanfilter
ubuntu:~# systemctl restart ntp
ubuntu:~# systemctl enable ntp

Step 3. Install, configure and start the WANsupervisor service
This step is required if you haven't previously installed and configured WANsupervisor on the target system. In order to configure the WANsupervisor service, you have to run the /opt/andrisoft/bin/install_supervisor script to enter the Console IP address and database password.
ubuntu:~# /opt/andrisoft/bin/install_supervisor
ubuntu:~# systemctl start WANsupervisor
ubuntu:~# systemctl enable WANsupervisor

Step 4. Setup the Filter
Log in to the Console to set up Filter(s). Filters are started, monitored and stopped by the WANsupervisor daemon, so make sure the WANsupervisor service is always running.

Wanguard and Wansight can be installed quickly and easily with the APT package manager on a stock Ubuntu Server 20.04 LTS. The software runs exclusively on 64-bit Intel or AMD architectures. This distribution will receive updates until April 2025.
Below you can find the installation steps for Console, Sensor and Filter.


USER GUIDES:   Wanguard 8.4 User Guide
Wansight 8.4 User Guide

CONSOLE
INSTALLATION
STEPS:
Step 1. Install the Andrisoft repository
First, add the Andrisoft repository to APT.
ubuntu:~# apt install ca-certificates
ubuntu:~# apt install apt-transport-https wget
ubuntu:~# wget --no-check-certificate -O - https://www.andrisoft.com/andrisoft.gpg.key | apt-key add -
ubuntu:~# echo "deb https://packages.andrisoft.com focal main" > /etc/apt/sources.list.d/andrisoft.list

Step 2. Install the packages
Install the wanconsole package and its dependencies. Configure and start ntpd to prevent clock desynchronization issues.
ubuntu:~# apt update
ubuntu:~# apt install wanconsole
ubuntu:~# systemctl restart ntp
ubuntu:~# systemctl enable ntp

Step 3. Configure MariaDB
By default, MariaDB is bound to the loopback interface so you must comment the bind-address parameter. Also, if you will use multiple servers, make sure that MariaDB is accessible by opening port tcp/3306 in firewall.
ubuntu:~# nano /etc/mysql/mariadb.conf.d/50-server.cnf #comment the bind-address directive
ubuntu:~# systemctl restart mariadb 

Step 4. Reload the Apache service
Reload the PHP configuration by restarting the Apache service.
ubuntu:~# systemctl restart apache2

Step 5. Install the database
Finish installing the Console by running the /opt/andrisoft/bin/install_console script. Enter the MySQL root password, and provide a password for a new database named "andrisoft". In Ubuntu 20, the recommended database storage engine is Aria.
ubuntu:~# /opt/andrisoft/bin/install_console

Step 6. Configure the WANsupervisor service
The WANsupervisor daemon must be installed and started on all systems. You have to run the /opt/andrisoft/bin/install_supervisor script to enter the Console's IP address and database password you set in step 5.
ubuntu:~# /opt/andrisoft/bin/install_supervisor
ubuntu:~# systemctl start WANsupervisor
ubuntu:~# systemctl enable WANsupervisor

Step 7. Install InfluxDB
Install influxdb from https://portal.influxdata.com/downloads or the link listed below and execute /opt/andrisoft/bin/install_influxdb to initialize the influxdb database.
ubuntu:~# wget https://dl.influxdata.com/influxdb/releases/influxdb_1.8.10_amd64.deb
ubuntu:~# dpkg -i ./influxdb_1.8.10_amd64.deb
ubuntu:~# cp /etc/influxdb/influxdb.conf /etc/influxdb/influxdb.conf.backup
ubuntu:~# cp /opt/andrisoft/etc/influxdb.conf /etc/influxdb/influxdb.conf
ubuntu:~# systemctl restart influxdb
ubuntu:~# /opt/andrisoft/bin/install_influxdb

Step 8. Access the Console
The Console web interface is accessible by pointing your web browser to http://<hostname>/wanguard or http://<hostname>/wansight, where <hostname> is the name of the server running the Console. The default username is "admin" with the password "changeme". It is highly recommended to install an SSL certificate in Apache to be able to connect securely to Console via HTTPS.
 
SENSOR
INSTALLATION 
STEPS:
Step 1. Install the Andrisoft repository
Add the Andrisoft repository to APT. You can skip these installation steps on the Console server.
ubuntu:~# apt install apt-transport-https wget
ubuntu:~# wget --no-check-certificate -O - https://www.andrisoft.com/andrisoft.gpg.key | apt-key add -
ubuntu:~# echo "deb https://packages.andrisoft.com focal main" > /etc/apt/sources.list.d/andrisoft.list

Step 2. Install the packages
Install the wansensor package and dependencies. Configure and start ntpd to prevent clock de-synchronization issues.
ubuntu:~# apt update
ubuntu:~# apt install wansensor
ubuntu:~# systemctl restart ntp
ubuntu:~# systemctl enable ntp

Step 3. Install, configure and start the WANsupervisor service
This step is required if you haven't previously installed and configured WANsupervisor on the target system. In order to configure the WANsupervisor service, you have to run the /opt/andrisoft/bin/install_supervisor script to enter the Console IP address and database password.
ubuntu:~# /opt/andrisoft/bin/install_supervisor
ubuntu:~# systemctl start WANsupervisor
ubuntu:~# systemctl enable WANsupervisor

Step 4. Setup the Sensor
Log into the Console to setup the Sensor(s). Sensors are started, monitored and stopped by the WANsupervisor daemon, so make sure the WANsupervisor service is always running.
 
FILTER
INSTALLATION
STEPS:
Step 1. Install the Andrisoft repository
Add the Andrisoft repository to APT. You can skip these installation steps on the Console server.
ubuntu:~# apt install apt-transport-https wget
ubuntu:~# wget --no-check-certificate -O - https://www.andrisoft.com/andrisoft.gpg.key | apt-key add -
ubuntu:~# echo "deb https://packages.andrisoft.com focal main" > /etc/apt/sources.list.d/andrisoft.list

Step 2. Install the packages
Install the wanfilter package and dependencies. Configure and start ntpd to prevent clock de-synchronization issues.
ubuntu:~# apt update
ubuntu:~# apt install wanfilter
ubuntu:~# systemctl restart ntp
ubuntu:~# systemctl enable ntp

Step 3. Install, configure and start the WANsupervisor service
This step is required if you haven't previously installed and configured WANsupervisor on the target system. In order to configure the WANsupervisor service, you have to run the /opt/andrisoft/bin/install_supervisor script to enter the Console IP address and database password.
ubuntu:~# /opt/andrisoft/bin/install_supervisor
ubuntu:~# systemctl start WANsupervisor
ubuntu:~# systemctl enable WANsupervisor

Step 4. Setup the Filter
Log in to the Console to set up Filter(s). Filters are started, monitored and stopped by the WANsupervisor daemon, so make sure the WANsupervisor service is always running.

Company News

SOLUCIONES PARA PREVENIR ATAQUES DDOS Y MONITORIZACIÓN

Andrisoft ha desarrollado dos aplicaciones basadas en Linux de gran innovación y precio asequible que resultan imprescindibles para administradores de redes y expertos en seguridad de organizaciones que manejan grandes redes IP, como Telecos, proveedores de acceso a Internet, centros de datos en la nube, redes de distribución de contenido o servicios de mitigación de ataques DDoS:

Wansight ofrece monitorización de ancho de banda, contabilidad IP y análisis exhaustivos del tráfico. Incluye un Sensor de flujos (Flow Sensor) que analiza los registros de flujo exportados por Cisco NetFlow, IPFIX, y sFlow así como un Sensor de paquetes Packet Sensor que analiza el tráfico entre dispositivos, los TAP o las configuraciones de puertos espejo. Una Console independiente del SO y basada en web ofrece gestión y elaboración de informes desde un único punto.

Wanguard amplía las funciones de Wansight con la integración de funciones avanzadas de detección y mitigación de ataques DDoS. Está concebido para proteger redes y servicios imprescindibles contra ataques volumétricos de denegación de servicio distribuido mediante la normalización (scrubbing) de paquetes maliciosos con reglas de filtrado dinámicas aplicadas a firewalls de hardware o software ubicados en el perímetro de la red. Es compatible con herramientas de reacción automatizadas, RTBH, BGP FlowSpec, desviación del tráfico, creación de scripts y agrupamiento de servidores.

PROTECCIÓN CONTRA DDOS EN 5 PASOS

alt Conozca Wanguard, nuestra solución de software para monitorizar redes de gran tamaño y protegerlas contra ataques DDoS.

alt Rellene el formulario de solicitud de evaluación de software para utilizar gratuitamente durante 30 días la versión de prueba de nuestro software.

alt Construya su propio dispositivo de mitigación de ataques DDoS mediante la instalación del software en un servidor Linux libre.

alt Utilice durante 30 días la versión de prueba completa. Nuestros ingenieros lo asistirán durante este periodo gratuitamente.

alt Adquiera en cualquier momento licencias anuales de software rentables a través de nuestra tienda online. Asistencia técnica es gratuito.

Wanguard 8.4 was released! Changelog and upgrade instructions at: https://t.co/4UIyox14bQ.
Follow Andrisoft on Twitter (X)
Join our Newsletter to receive the latest news from us!

  OUR CLIENTS  

  • Telecom Operators: HUAWEI | VODAFONE | ORANGE | JT GLOBAL | BITE LITHUANIA | MOLDTELECOM | JUPITER TELECOMMUNICATIONS

  • Internet Service Providers: GOOGLE FIBER | YELLOWFIBER | SKYLOGIC EUTELSAT | 1&1 VERSATEL | NETCOLOGNE | SOLCON NETHERLANDS

  • Cloud / VPS Hosting Providers: DIGITALOCEAN | LEASEWEB | FLEXENTIAL | WEEBLY | VPS.NET | EAPPS | SERVERPOINT

  • Software & Services: IBM CORPORATION | MOZILLA CORPORATION | NAMECHEAP | GANDI SAS | ALLEGRO | MBANK | TF1 FRANCE

  • Security / Anti-DDoS Services: GIGENET | BLACKLOTUS | KODDOS | ROKASECURITY | DOSARREST | SERVERIUS

  • Data Centers: EQUINIX | PHOENIXNAP | CORE-BACKBONE | BSO NETWORK | ASCENTY | PLUSSERVER | MYLOC MANAGED IT